Hi there, remember me? A few things happened since I posted the first parts of this tutorial (Lordy it's been interesting times!) and somehow the last few steps never got finished...sorry about that! But here, at last, is the final part. I hope it's easy to understand and, as always, please ask any questions in the comments and I'll try to answer them as quickly as possible. So here goes!The first thing to do is check the pattern against your doll's head to make sure it will fit. Since we made the heads by hand without a pattern there can be some variance.
I decided to make my hats a bit bigger since these were large heads and its easy to place the pattern to accommodate that. Now cut your hat and collar out of felt. I use 100% wool felt because it comes in such gorgeous colors, but you can use any felt that's not too thick. You'll also need matching embroidery floss.
Sew the collar on following these steps. Anchor the knot in the underside and then take a stitch in the back of the collar.
Bring the needle through the doll to the front of the collar and then back.
Take a stitch in the back to close the collar and make a tiny knot, then bury the end of your thread and cut off. Your collar is done! Let's get to that cap...but wait first we need some hair! I used boucle mohair for this but once again use whatever yarn you like. I usually wind the yarn around my thumb 5 times and that's the perfect amount.
Then run a needle with a knitted thread inside the loops and through, go between the two threads, and draw tight so that you secure all the yarn loops. Now sew that to the doll's head.
Don't worry if it looks a bit wild, the hat will sort that out.
LOL! They definitely look like they've been having fun!
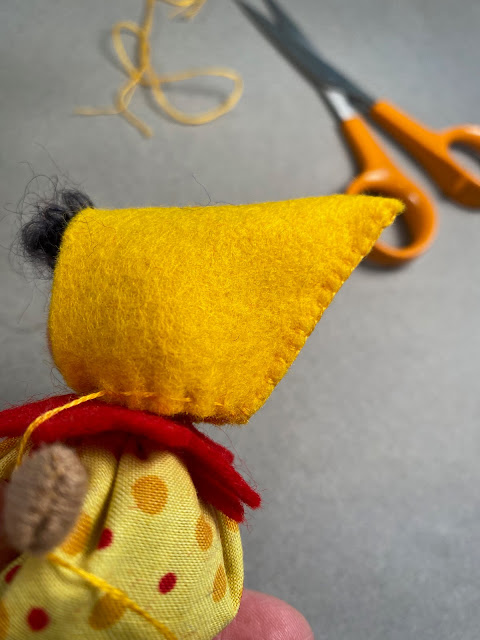
NOW, let's make that hat! First you'll need to sew up the back with a neat buttonhole stitch. Make sure to hide the knot inside the hat and finish by hiding the thread end in the seam. Place the hat on the doll Hide your knot inside the hat and sew through the hat and the doll's head to the other side and then back again. Pull tight. Now you want to take a running stitch around the bottom of the hat and pull that tight as well.
Insert your needle through the head from next to your last stitch and out the top near the front. Then insert needle from the top to the seam in the back.
We're almost done! Anchor your thread and hide the end inside the doll's head. Now stretch the front of the hat with your fingers, GENTLY, to make more of a bonnet shape and it should look like this...
And that's it! You've made a sweet little baby that would be super cute in an Easter basket or for a Mother's Day present. They are lovely in a drawer or on a Nature table with their lavender scent. I hope you give the pattern a try!


I love them! 😍😍
ReplyDelete